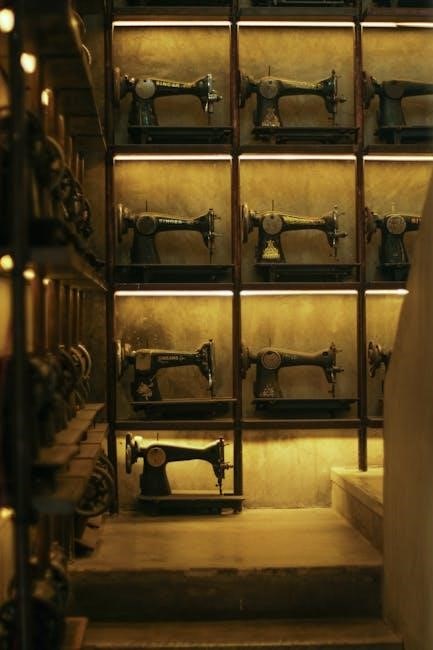
The Singer 401a is a versatile and durable sewing machine designed for both beginners and experienced sewists. Known for its ease of use and robust construction‚ it offers a wide range of stitches‚ including straight‚ zigzag‚ and decorative options. The machine’s manual is an essential resource‚ providing detailed guidance on setup‚ operation‚ and maintenance to ensure optimal performance and creativity.
1.1 Overview of the Singer 401a
The Singer 401a is a vintage sewing machine renowned for its durability and versatility. It features a slant needle‚ automatic stitch selection‚ and a robust gear drive system‚ making it ideal for various sewing tasks. Known as the Slant-o-Matic‚ it offers smooth operation and consistent stitching. The machine’s popularity endures among sewists due to its ease of use and ability to handle both simple and decorative projects. Its comprehensive manual provides detailed instructions for setup‚ operation‚ and maintenance‚ ensuring optimal performance for users of all skill levels.
1.2 Key Features of the Singer 401a
The Singer 401a boasts an array of features that make it a standout sewing machine. It includes a slant needle for better fabric visibility‚ automatic stitch selection‚ and a built-in zigzag capability. The machine also comes with a knee lever for hands-free control‚ allowing for precise stitching. Additionally‚ it supports various decorative stitches and is equipped with a top-load bobbin system for easy threading. Its durable construction and user-friendly design ensure long-lasting performance and versatility for both basic and advanced sewing projects.
1.3 Importance of the Manual for Optimal Use
The Singer 401a manual is a comprehensive guide essential for unlocking the machine’s full potential. It provides clear instructions for setup‚ operation‚ and maintenance‚ ensuring users avoid confusion and potential damage. The manual offers step-by-step guidance for threading‚ stitching‚ and troubleshooting‚ helping users master both basic and advanced techniques. By following the manual‚ sewists can maintain their machine’s performance‚ extend its lifespan‚ and achieve professional-quality results in their sewing projects.

Understanding the Singer 401a Manual
The Singer 401a manual is a comprehensive guide offering clear instructions for setup‚ operation‚ and maintenance. It ensures users can troubleshoot and optimize their sewing experience effectively.
2.1 Structure and Content of the Manual
The Singer 401a manual is organized into clear sections‚ starting with an overview of the machine’s components. It includes detailed instructions for threading‚ bobbin winding‚ and stitching techniques. The manual also covers maintenance tips‚ such as cleaning and lubricating the machine‚ ensuring longevity. Troubleshooting guides and diagrams are provided to help users identify and resolve common issues. Additional resources like stitch charts and accessory information enhance the user’s sewing experience.
2.2 How to Use the Manual Effectively
To use the Singer 401a manual effectively‚ start by familiarizing yourself with the table of contents and index. Locate specific sections quickly by referencing page numbers. Follow step-by-step instructions for tasks like threading and stitch selection. Use the included diagrams to identify parts and understand complex procedures. Pay attention to troubleshooting guides for common issues‚ and refer to maintenance tips to keep your machine in optimal condition. Practice techniques described in the manual to master your sewing skills efficiently.
2.3 Common Sections Found in the Manual
The Singer 401a manual typically includes sections on machine setup‚ threading‚ and bobbin installation. It features detailed stitch guides‚ maintenance tips‚ and troubleshooting advice. Additional sections cover accessory usage‚ such as the professional buttonholer‚ and provide diagrams for parts identification. The manual also offers sewing techniques and safety precautions‚ ensuring comprehensive guidance for all users. These sections are designed to help you maximize your machine’s potential and resolve any issues that may arise during use.

Setting Up the Singer 401a Sewing Machine
Setting up the Singer 401a involves unpacking‚ mounting on a desk‚ and adjusting for comfort. Follow manual instructions to ensure proper installation and ergonomic positioning for seamless operation.
3.1 Unpacking and Initial Setup
Welcome your Singer 401a by carefully unpacking it from the box. Inspect the machine for any damage and ensure all accessories‚ like the knee lever and presser feet‚ are included. Gently wipe down the machine with a soft cloth to remove any dust or packaging residue. Before first use‚ refer to the manual for guidance on proper setup and initial adjustments to ensure smooth operation. This step is crucial for maximizing the machine’s performance and longevity.
3.2 Mounting the Machine on a Desk
Mounting the Singer 401a on a desk ensures stability and ease of use. Begin by clearing the area of any obstructions. Locate the hinge pins at the back of the desk and carefully tilt the machine backward‚ supporting its weight to avoid damage. Attach the machine securely to the desk using the provided hinges‚ ensuring a level position. Tighten all connections firmly and test the machine by sewing a small piece to confirm stability. Proper mounting enhances sewing performance and prevents vibrations.
3.3 Adjusting the Machine for Comfortable Use
Adjusting the Singer 401a for comfortable use involves ensuring proper ergonomics. Position the machine at a height that allows you to sew without straining your back or arms. Ensure good lighting to view your work clearly. Organize your workspace to keep fabric‚ threads‚ and accessories within easy reach. Adjust the chair height so your hands are at a neutral position while sewing. Fine-tune the machine’s tension and stitch length as needed for smooth operation. These adjustments enhance sewing efficiency and reduce fatigue during extended use.

Basic Operations of the Singer 401a
Mastering basic operations ensures smooth sewing. Start by threading the machine correctly‚ winding the bobbin‚ and inserting it properly. Sew straight lines by guiding fabric evenly under the needle‚ adjusting stitch length and tension as needed for perfect results.
4.1 Threading the Machine
Threading the Singer 401a is straightforward when done correctly. Begin by placing the thread on the spool pin and guide it through the tension discs. Pull the thread gently to ensure it seats properly. Next‚ pass the thread through the take-up lever and then insert it into the needle. Keep the presser foot up to prevent the thread from tangling. Always use high-quality thread suitable for your fabric type. Refer to the manual for visual guides to ensure accurate threading and optimal stitch quality.
4.2 Winding and Inserting the Bobbin
To wind the bobbin‚ place it on the winder and pull the thread from the spool. Wind slowly‚ ensuring the thread fills the bobbin evenly without overfilling. Once full‚ cut the thread and insert the bobbin into the bobbin case. Pull the thread to seat it properly. For top-load machines‚ open the bobbin compartment and gently place the bobbin inside‚ ensuring the thread aligns correctly. Always use the same thread type as the upper thread for consistency. Refer to the manual for specific diagrams and guidance.
4.3 Sewing a Straight Line
To sew a straight line on the Singer 401a‚ select the straight stitch option (typically stitch number 1). Ensure the machine is properly threaded and the bobbin is inserted correctly. Place the fabric under the presser foot‚ aligning the edge with the guide. Gently guide the fabric as it moves under the needle‚ maintaining a steady pace. Use the machine’s built-in edge guide for consistent alignment. Keep the fabric smooth and evenly fed to achieve a straight‚ professional-looking seam.
Advanced Features of the Singer 401a
The Singer 401a offers advanced features like zigzag stitching‚ decorative patterns‚ and a knee lever for hands-free control‚ enhancing creativity and versatility in sewing projects.
5.1 Using the Zigzag Stitch
The Singer 401a’s zigzag stitch is perfect for stretchy fabrics‚ preventing fraying‚ and creating decorative edges. To use it‚ select the zigzag stitch option‚ adjust the stitch length and width‚ and sew slowly. This feature adds versatility to your projects‚ allowing for both functional and creative stitching. The machine’s ease of use makes it ideal for sewists of all skill levels‚ ensuring professional-looking results every time.
5.2 Creating Decorative Stitches
The Singer 401a offers a variety of decorative stitches‚ perfect for embellishing fabrics. Users can explore multiple stitch patterns to add unique detailing to garments or home decor. To create decorative stitches‚ select the desired pattern‚ adjust the stitch length and width‚ and sew at a steady pace. This feature allows for creative expression‚ making it ideal for crafting custom designs. Proper tension and fabric guidance ensure crisp‚ professional-looking results every time.
5.3 Using the Knee Lever for Hands-Free Control
The Singer 401a features a knee lever that allows for hands-free control‚ enabling easier fabric manipulation. This lever‚ when properly attached‚ lets you lift the presser foot without removing your hands from the fabric. It’s ideal for quilting or handling large projects. Position the lever comfortably to avoid strain and ensure smooth operation. This feature enhances sewing efficiency and precision‚ making it a valuable tool for sewists seeking greater control over their work.
Maintenance and Care of the Singer 401a
Regular cleaning and lubrication with Singer oil are essential for maintaining the 401a’s performance. Periodic maintenance ensures smooth operation and prevents mechanical issues over time.
6.1 Cleaning the Machine
Regular cleaning is crucial for maintaining the Singer 401a’s performance. Use a soft brush to remove lint and debris from the bobbin area and interior. Wipe the exterior with a damp cloth‚ avoiding harsh chemicals. Periodically‚ clean the tension discs and feed dogs to ensure smooth fabric flow. Refer to page 86 of the manual for detailed cleaning instructions. Proper maintenance prevents dust buildup and ensures optimal functionality‚ keeping your machine in excellent working condition for years.
6.2 Lubricating the Machine
Lubrication is essential for smooth operation of the Singer 401a. Use high-quality Singer Oil or Singer Lubricant‚ specifically designed for sewing machines. Apply a few drops to moving parts‚ such as the handwheel‚ gears‚ and bobbin area‚ to reduce friction and prevent wear. Refer to the manual for detailed lubrication points and frequency. Regular lubrication ensures the machine runs quietly and efficiently‚ maintaining its performance over time. Avoid using household oils‚ as they may damage the machine’s internal components.
6.3 Troubleshooting Common Issues
Troubleshooting the Singer 401a involves identifying common issues like thread jams‚ uneven stitches‚ or machine noise. Check for loose threads‚ incorrect tension settings‚ or misaligned needles. Ensure the bobbin is properly seated and the machine is well-lubricated. For noise‚ inspect gears for dust or misalignment. Refer to the manual for step-by-step solutions. Regular maintenance‚ such as cleaning and oiling‚ can prevent many of these issues. If problems persist‚ consult the manual or contact Singer support for assistance.
Accessories and Attachments for the Singer 401a
The Singer 401a offers various accessories‚ including a professional buttonholer and knee lever‚ to enhance functionality. Additional attachments expand creative possibilities‚ as detailed in the manual.
7.1 Essential Accessories for Enhanced Functionality
The Singer 401a comes with essential accessories that boost productivity and creativity. These include a professional buttonholer for perfect buttonholes‚ a knee lever for hands-free control‚ and various presser feet for specialized stitching. Additional accessories like extra bobbins‚ needles‚ and lubricants ensure smooth operation. These tools‚ detailed in the manual‚ help users tackle diverse sewing projects with ease and precision‚ making the Singer 401a a versatile choice for sewists of all levels.
7.2 Using the Professional Buttonholer
The Singer 401a’s professional buttonholer is a valuable accessory for creating perfect buttonholes effortlessly. Attach it by snapping it onto the machine’s shank and adjusting for buttonhole size. Simply place your fabric under the buttonholer‚ select the buttonhole stitch‚ and let the machine do the work. This accessory ensures consistent results‚ making it ideal for garments and home decor projects. The manual provides clear instructions for its use‚ ensuring professional-looking finishes every time.
7.3 Other Optional Attachments
Beyond the buttonholer‚ the Singer 401a supports various optional attachments to enhance functionality. These include edge joiners for seamless fabric joining‚ rufflers for gathering fabric‚ and specialized quilting guides for precise stitching. Additional attachments like zipper feet‚ blind hem feet‚ and embroidery hoops can also be used to expand the machine’s capabilities. These accessories are designed to simplify complex tasks and improve sewing accuracy‚ making the Singer 401a adaptable to diverse sewing projects and preferences.

Singer 401a Parts Diagram
The Singer 401a parts diagram provides a detailed visual guide to the machine’s components‚ aiding in identification and repairs. It is an invaluable resource for maintenance and troubleshooting.
8.1 Understanding the Machine’s Components
Understanding the Singer 401a’s components is crucial for effective operation and maintenance. The parts diagram in the manual identifies key elements like the bobbin case‚ tension discs‚ and stitch selectors. These components work together to ensure smooth stitching and versatility. Familiarizing yourself with their locations and functions helps in troubleshooting and performing routine maintenance. The manual provides clear descriptions‚ enabling users to identify and access parts easily. This knowledge is essential for optimizing the machine’s performance and extending its lifespan. Regular reference to the diagram ensures proper care and efficient repairs.
8.2 Locating and Identifying Key Parts
The Singer 401a manual includes a detailed parts diagram to help users locate and identify essential components. Key parts like the bobbin case‚ tension discs‚ and stitch selectors are clearly labeled. This visual guide ensures users can quickly find and understand each part’s function. The diagram is color-coded or labeled for clarity‚ making it easier to navigate the machine’s features. By referencing the manual‚ users can identify parts accurately‚ which is vital for maintenance‚ repairs‚ and overall operation of the Singer 401a sewing machine;
8.3 Using the Parts Diagram for Repairs
The Singer 401a parts diagram is an invaluable tool for repairs‚ allowing users to identify and locate specific components. By referencing the diagram‚ users can diagnose issues‚ such as faulty bobbin cases or tension discs‚ and understand how parts interact. It guides users in disassembling and reassembling the machine‚ ensuring repairs are accurate. The diagram also helps in ordering replacement parts and verifying their correct installation. This visual aid simplifies the repair process‚ making it accessible for users of all skill levels to maintain their machine effectively.
Singer 401a Service and Repair
Regular maintenance and repairs are crucial for extending the life of your Singer 401a. The manual provides detailed guidance on servicing‚ lubrication‚ and troubleshooting common issues to ensure optimal performance.
9.1 Basic Repair Techniques
Basic repair techniques for the Singer 401a involve addressing common issues like jamming‚ uneven stitching‚ or mechanical misalignment. Start by cleaning the machine thoroughly‚ removing dust and debris. Lubricate moving parts using Singer-approved oil to ensure smooth operation. Check and tighten loose screws‚ and inspect belts for wear. For more complex problems‚ consult the manual for step-by-step guidance on adjusting tension‚ timing‚ or replacing worn components; Always ensure the machine is unplugged before attempting repairs to avoid accidents.
9.2 Adjusting the Tension and Timing
Adjusting the tension and timing on the Singer 401a ensures proper stitch formation and smooth operation. Start by checking the bobbin case and top thread tension‚ making sure they are balanced to avoid loose or tight stitches. For timing adjustments‚ refer to the manual for specific instructions‚ as improper alignment can lead to uneven stitching or machine damage. Regularly clean and lubricate the machine with Singer-approved oil to maintain optimal performance and prevent mechanical issues.
9.3 Replacing Worn or Damaged Parts
Replacing worn or damaged parts on the Singer 401a is crucial for maintaining its performance. Always use Singer-approved replacement parts to ensure compatibility and durability. Start by identifying the worn part using the parts diagram in the manual. Turn off the machine‚ unplug it‚ and carefully remove the damaged component. Replace it with the new part‚ ensuring proper alignment and secure fastening. After replacement‚ test the machine to confirm smooth operation and adjust tension and timing if necessary for optimal stitching.
Downloading and Accessing the Manual
The Singer 401a manual is available online as a free PDF download‚ providing easy access to instructions for setup‚ operation‚ and maintenance. Print it for convenience.
10.1 Where to Find the Singer 401a Manual Online
The Singer 401a manual can be found on various online platforms‚ including the official Singer website and third-party manual repositories. Websites like ManualsLib and Internet Archive offer free downloads of the 116-page user manual. Additionally‚ sewing communities and forums often share links to downloadable PDF versions. Ensure to verify the source’s reliability to avoid incorrect or incomplete information. Using official or trusted sites guarantees access to the authentic and comprehensive guide for your sewing machine.
10.2 Tips for Downloading the Manual Safely
When downloading the Singer 401a manual‚ ensure you use reputable sources like official Singer websites or trusted manual repositories. Avoid suspicious links or unauthorized sites to prevent malware risks. Always verify the file format is PDF and scan the document with antivirus software before opening. Additionally‚ check the manual’s authenticity by cross-referencing the content with known specifications of the Singer 401a. This ensures you obtain a safe and reliable guide for your sewing machine.
10.3 Printing the Manual for Easy Reference
For easy access‚ print the Singer 401a manual on high-quality paper using a reliable printer. Consider double-sided printing to save space and bind the pages securely. Use a clear font size and ensure images are legible. Organize the manual by section‚ such as setup‚ operation‚ and troubleshooting‚ for quick navigation. Store it in a protective cover or binder to prevent wear. This printed version allows for hands-free reference while using the machine‚ making your sewing projects more efficient and enjoyable.
Additional Resources for Singer 401a Users
Explore online communities‚ forums‚ and video tutorials for tips and troubleshooting. Contact Singer customer support for expert guidance and official assistance with your Singer 401a sewing machine.
11.1 Online Communities and Forums
Join online sewing communities and forums dedicated to Singer 401a users for tips‚ troubleshooting‚ and shared experiences. These platforms offer valuable insights‚ repair advice‚ and creative ideas. Engage with fellow sewists to resolve common issues and learn new techniques. Many forums also host tutorials and guides specific to the Singer 401a‚ making them an invaluable resource for both beginners and experienced users. Participating in these communities fosters collaboration and helps you make the most of your sewing machine.
11.2 Video Tutorials and Guides
Video tutorials and guides provide visual‚ step-by-step instructions for mastering the Singer 401a. Platforms like YouTube offer a wealth of content‚ including setup‚ threading‚ and stitching techniques. Channels such as “Singer Sewing Company” and “Vintage Sewing Machines” share detailed demonstrations. These videos are particularly helpful for understanding complex features like the knee lever and decorative stitches. Additionally‚ repair and maintenance tutorials empower users to troubleshoot and service their machines independently‚ ensuring optimal performance and longevity.
11.4 Contacting Singer Customer Support
For assistance with your Singer 401a‚ contact Singer Customer Support through their official website‚ phone‚ or email. Their team provides expert guidance‚ troubleshooting‚ and repair advice. Visit Singer’s website to access support resources‚ including manuals‚ FAQs‚ and repair guides. Additionally‚ Singer-authorized service centers offer professional maintenance and repairs. Reach out for inquiries about accessories‚ technical issues‚ or general support to ensure your machine operates at its best.
No Responses